How to Use CrystalDiskMark
Follow these steps to run a disk benchmark and understand the results.
Last updated: March 2025.
Before You Start
Close other programs that use the disk heavily (browsers with many tabs, download managers, backup software, antivirus scans). This keeps results consistent. Make sure the drive you want to test has enough free space—at least as much as the test size you will select (e.g. 1 GiB free for a 1 GiB test). For local drives, running CrystalDiskMark as Administrator avoids “access denied” errors; for network drives, run as a standard user so the drive appears in the list. See the FAQ for more on Administrator vs standard user and benchmark failed fixes.
How to Start a Benchmark
-
1
Select Number of Test Runs. Default is 5; you can choose 1–9. More runs give more stable averages but take longer.
-
2
Select Test Size. Options: 16MiB, 32MiB, 64MiB, 128MiB, 256MiB, 512MiB, 1GiB, 2GiB, 4GiB, 8GiB, 16GiB, 32GiB, 64GiB. Default is 1GiB. For slow storage (e.g. USB flash), use a smaller size.
-
3
Select Test Drive. Choose the drive letter (C:\, D:\, etc.). To benchmark a network drive, run CrystalDiskMark as a standard user (UAC: No), not as Administrator.
-
4
Click “All” (or another button) to start the benchmark. “All” runs the full set of tests; you can also run individual tests.
Main Window
Main window: Number of runs, Test Size, Drive, and All / individual test buttons.
Test Settings
You can change Block Size, Queue, and Thread settings via the settings (e.g. “Settings” or gear icon). These affect how the benchmark stresses the drive and are useful for comparing with other tools or real-world workloads.
Test Units
Results can be shown as:
- MB/s – Megabytes per second (1 MB/s = 1,000,000 bytes/sec)
- GB/s – Gigabytes per second
- IOPS – I/O operations per second
- μs – Average latency in microseconds
Units Used by CrystalDiskMark
- • 1 GB = 1000 MB = 1000×1000 KB = 1000×1000×1000 B (decimal)
- • 1 GiB = 1024 MiB = 1024×1024 KiB = 1024×1024×1024 B (binary)
Test Profiles: Peak, Real World, Demo
CrystalDiskMark offers different measurement profiles. You can switch them from the menu or profile selector.
Peak (default)
Optimized for maximum throughput. Uses settings that often yield the highest MB/s numbers (e.g. larger queue depth, sequential access). Good for comparing “best case” performance and advertised specs.
Real World
Uses workloads that mimic more typical usage (mixed read/write, different block sizes). Numbers are usually lower than Peak but may better reflect how the drive behaves in everyday use.
Demo
A shorter or simplified run, useful for quick demos or when you don’t need full precision. Results are not directly comparable to full Peak or Real World runs.
Understanding the Results
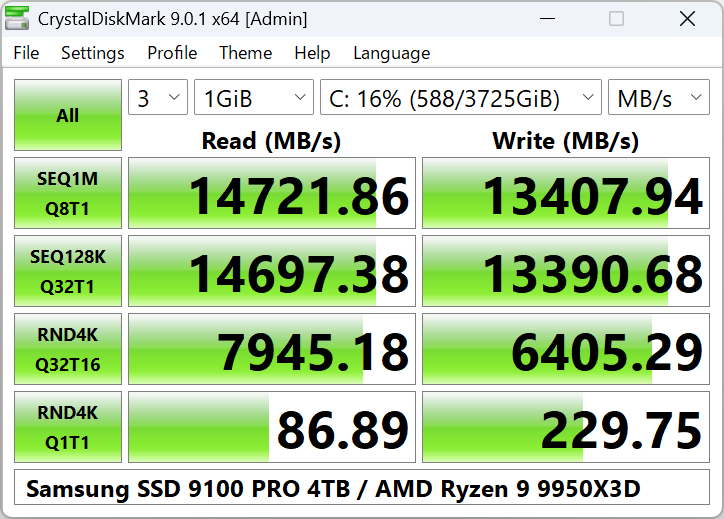
After the benchmark finishes, you see columns and rows with numbers. Each row is a test (e.g. Sequential Read, Random 4K Write), and the value is usually the average of the runs (or the last run, depending on display).
- SEQ1M Q8T1 / SEQ1M Q1T1 – Sequential 1 MiB block, queue 8 thread 1 and queue 1 thread 1. Typical “headline” sequential speed.
- RND4K Q32T1 / RND4K Q1T1 – Random 4 KiB, queue 32 and queue 1. Important for OS and app responsiveness.
- Mix – Mixed read/write workload. Useful for real-world-like comparison.
You can copy results to the clipboard or save as image from the program menu for sharing or documentation.
Interpreting Results in Practice
High sequential numbers (e.g. 3000+ MB/s) mean the drive can move large files quickly—good for video editing, game installs, and big backups. High random 4K numbers mean snappier Windows and app launches. If one number is high and another low, your drive may be optimized for one type of workload. When comparing two drives, always use the same CrystalDiskMark settings (test size, number of runs, profile) and preferably the same major version of the program.
Tips and Best Practices
- Close heavy apps – Other disk activity can lower or vary results. Close browsers, downloads, and backup tools during the test.
- Same settings for comparison – When comparing two drives, use the same test size, run count, and profile (e.g. Peak, 1 GiB, 5 runs).
- SSD wear – Benchmarking writes a lot of data. Don’t run it constantly on SSDs if you’re concerned about endurance; occasional runs are fine.
- Network drives – Run as standard user (UAC No), not Administrator, so network drives appear. See FAQ.